How to Setup a Hub,Node and parallel execution for Selenium Grid
How to Setup a Hub and Node for Selenium Grid
Selenium Grid allows us to execute our tests in multiple
machines (physical / virtual) and multiple browsers with different versions,
which dramatically speeds up test execution and helps in reducing total amount
of time required for test execution.
For example, if we have a script that takes 100 minutes
to execute sequentially , we could break that down to 10 short tests script run
across 10 machines, and can complete them in 10 minutes without copying your
test code to the other machine.
A grid consists of a single
hub, and one or more nodes, Hub and Node are the two main elements that you
come across when using grid. Download selenium grid and selenium server.
Hub the Hub is the central point which will receive
all the test requests along with information on which browser, platform (i.e.
WINDOWS, LINUX, etc) and where the test should be run. Based on the request
received, it will distribute them to the registered nodes.
Command to start a hub with
default parameters -java -jar selenium-server-standalone-2.48.2.jar
-role hub
After starting the hub, we
can view the status of the hub by opening any browser window and navigating to: http://localhost:4444/grid/console . If you have used any other port, you need to
mention that port value instead of default port 4444
Below is the command to register node with a Hub.
If we are not specifying any parameters when starting node, it defaults to 5555
whenever "-role" option is provided and is not hub.
When the hub is running in
the same machine, we use ‘localhost’ for node. If Hub and Node are running on
separate machines, we have to register Node using the hostname of the remote
machine running the hub.
We have done with starting the Hub and Registering Nodes with
the Hub. Now we need to run our tests with Selenium Grid, For webdriver nodes,
we need to use the RemoteWebDriver and DesiredCapabilities object to define which browser,
version of the browser and platform (OS - Windows / LINUX etc) that we want to
run our tests.
Based on preferences that we set in the DesiredCapabilities
instance, the Hub will point our tests to a node that matches with these
preferences. If we specify capabilities that do not exist on our grid then
there will be no match and the test will fail to run.
Why we need to use RemoteWebdriver Not the webdriver ?
If we use driver (FirefoxDriver / ChromeDriver / or other) not
RemoteWebDriver, it will just assume that the communication to the browser is
local. Example: - Webdriver
driver = new FirefoxDriver(); Using
this, driver will access Firefox browser which is available on the local
machine.
If we use RemoteWebDriver, it requires us to specify where the
Selenium Server is located and on which web browser we want to execute our
tests. For example,
WebDriver driver = new
RemoteWebDriver(new URL("http://localhost:4444/wd/hub"), DesiredCapabilities.firefox());
Execute webdriver tests in Parallel using selenium Grid
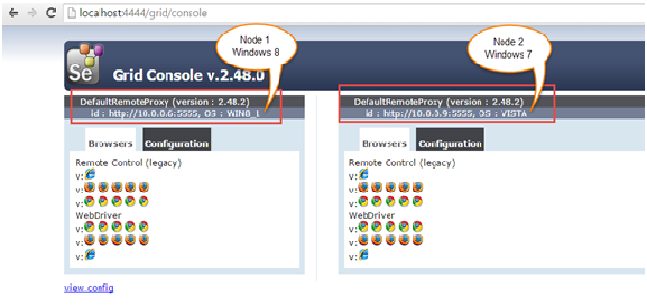
We will register multiple nodes to the Hub and execute tests in
parallel. In the below example we will register a node in the same local machine
where hub is running and other node in remote machine.
We will register node
1 in local machine with
the below command:
java -jar selenium-server-standalone-2.48.2.jar -role node -hub http://localhost:4444/grid/register
java -jar selenium-server-standalone-2.48.2.jar -role node -hub http://localhost:4444/grid/register
We will register node
2 with the below command
in remote machine. In the below command, need to pass a parameter by passing
JVM properties using the -D flag along with chrome driver path , so that when
ever there is a request to execute in chrome driver, Hub will send the request
to this node. And here we have to mention the IP address of the machine where
the hub is running as we are starting this node in remote machine.
java -jar selenium-server-standalone-2.48.2.jar -role node -hub http://10.0.0.6:4444/grid/register -Dwebdriver.chrome.driver=.\chromedriver.exe
Now to execute these tests, we need to create
testng.xml file as below and set parallel="tests" with parameter
browser for each test
Create two test classes ParallelTestA and ParallelTestB with
different browser @Parameter
xml version="1.0" encoding="UTF-8"
<suite name="Main Test Suite" parallel="tests" verbose="1">
<test name="Grid firefox Test">
<parameter name="browser" value="firefox" />
<classes>
<class name="com.test.ParallelTestA" />
</classes>
</test>
<test name="Grid chrome Test">
<parameter name="browser" value="chrome" />
<classes>
<class name="com.test.ParallelTestB" />
</classes>
</test>
</suite>
There are many other parameters for browser settings that we can
pass when registering node to hub. When ever we use -browser parameter, the default browsers will
be ignored and only what we specify in command line will be used.
Example :
-browser
browserName=firefox,version=30,maxInstances=5,platform=WIN8_1

Comments
Post a Comment